Building a frame to cover with GrowCover netting.
Gardeners are versatile people and many will use their ingenuity to construct a frame to support the GrowCover. There are many options using recycled materials or other materials easily available to buy.
We made our first hoop house frames with recycled agricultural poly pipe and used an old fire guard to cover seed propagation trays. Hoop frames can be easily made from 20mm blue line irrigation pipe, 25mm poly pipe, 20mm white pvc plumbing pipe and UV protected PVC electrical conduit which is good because it is flexible.
It is best to avoid anything with rough or sharp edges like timber or chicken mesh.
You can use GrowCover without a frame, just throw it over theplants as a floating row cover.This is quite handy when you have fruiting plants like tomatoes that need protection from birds or a newly seeded area which benefits from the extra water retention.
In our experience for growing vegetables a frame works better. Just lift the GrowCover when you need to weed, harvest or give pollinating insects access, and clip the fabric to the frame to keep it out of your way.
Below is how we have made hoop frames.
They are simple to build, are flexible in size and can be moved easily.
We made our frames to fit the length of garden beds. They are very easy to take down and re-erect anywhere. If your garden bed is too long for the standard GrowCover sizes you can buy custom cut lengths to fit. Remember to allow for the height of the hoop house at both ends.
For vegetables grown for their fruit remember to lift and clip the GrowCover up during flowering to let insects in to pollinated the plants. Replace the GrowCover again after flowering or overnight too if you wish.
For more information on pollination you might find the Harvest to table website interesting.


Left: Two low hoop house frames using 2m x 10m GrowCover netting.
Right: GrowCover pulled back and held with Jumbo Clips
Poly pipe hoop frame
We have used a variety of materials to make frames including poly irrigation pipe, PVC plumbing pipe, and metal tubes. 25mm black poly rural pipe or 20mm blue line irrigation pipe is rigid enough to support the structure and smooth so that the GrowCover does not catch, making it easy to lift on or off. You can also use white pvc plumbing pipe which is rigid and needs joiners to make a frame or U V resistant grey pvc electrical conduit which is flexible and does not need joiners.
For a poly pipe frame we cut the poly pipe 20 centimeters shorter than the width of the GrowCover netting so there is a ground flap left over of 10 centimeters each side.
- For 2.1m wide GrowCover each hoop needs to be 1.9 m
-
For 3m wide GrowCover each hoop needs to be 2.8 m
-
For 4.2m wide GrowCover each hoop needs to be 4.0 m
If you use PVC electrical conduit in a raised bed you can make the hoops longer and push the ends into the ground.
For tall frames we brace the sides with horizontal rods joining the hoops together.
As a rule of thumb we installed the hoops of poly pipe at intervals of about one metre, then adjusted to the length of the bed.
We find this gave good stability while giving easy access to the plants growing under the GrowCover hoop house.
The width of the frame used for the the GrowCover is up to you.The narrower you make it the higher the hoops at the apex as long as the hoops are not longer than the chosen netting width.
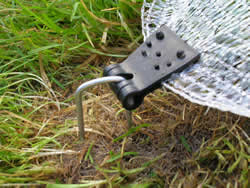
To hold the hoops in place we pushed (or hammered) galvanised metal rods 40 centimeters long into the ground leaving about 15 centimeters above the surface. Normally the rods would be perpendicular, but if you decided to have a very wide and low hoop tunnel you may find it better to lean them slightly inwards.


The pictures above show poly pipe sliding over a metal spike to support a hoop. Once all the hoops are installed you are ready to cover with the GrowCover.
Ways to secure GrowCover to poly pipe frames and the ground
We allowed a 10cm flap of GrowCover on each side at ground level that this can be held down by bricks, pegs, lengths of timber or earth staples to make it more difficult for pests to crawl underneath and chomp on your young plants.
Jumbo clips are exceptionally easy and quick to attach and replace and do not tear the GrowCover. We use them to clamp the GrowCover to 25mm poly pipe hoops.
Butterfly clips can be attached to the edge of the GrowCover and pegged into the ground. Double over the GrowCover for extra strength.
Cut lengths of poly pipe. You can try cutting short lengths of poly pipe, splitting them lengthways and inserting them over the GrowCover and onto the frame pipe.
Use golf balls and rubber spline (used in fly screens) to secure the ends as shown in the photos to the left.


Securing the ends
The GrowCover at the ends of the frames can be secured in a number of ways, the simplest is to put a loose piece of timber or bricks on the end or roll the timber up in any spare GrowCover to secure it. Alternatively you can gather the GrowCover together tie with string or a strong rubber band and peg into the ground.
Methods we have tried are shown below.
A garden stake can be inserted into a seam at the end of the GrowCover to keep the end flaps in place.
This also makes it easy to handle the GrowCover when removing or installing. If the stake is wider than the cloche or hoop house it stops the wind blowing the ends inwards.
Butterfly clips can easily be attached to the GrowCover, threaded with tape or string, pulled together or spread out and pegged into the ground. Remember the fewer pegs you have to remove for tending the plants the better.
Make a seam and thread with tape or string (rubber spline used for fly screens works well ) to gather the GrowCover together and peg it into the ground.
Use Earth Staples – the easiest of all, and keeps the GrowCover secure against wind and small animals.
Make your own using butterfly clips and weed mat pins.


For tall frames it is best to draw the GrowCover from the sides to meet in the middle. Secure the overlapping GrowCover at ground level and then at the top of the frame.
See the illustration on the left on securing the ends vertically.
You can of course put more than one frame in a wide garden bed, for example if you prefer to have two small frames side by side instead of one big one it works just fine.
Just experiment and see what works for you. If you are growing up against a wall other designs would work – something like a roman blind perhaps.
Below shows how to fix the ends of a tall frame with a GrowCover overlap


Download these instructions
To work out length of GrowCover you need:
The length of GrowCover you need depends on how you will close off the ends.
For tall frames it is better to draw the GrowCover from the sides to the centre of the ends and fix to a stake and gather the loose GrowCover near the top together into a clamp.
The length of GrowCover needed for tall frames is the frame length + frame width+ an extra 2Ocm for overlap to securing the ends.
For low frames it is easiest to drape the GrowCover over the ends and down to the ground.
The length of GrowCover needed for low frames is frame length + twice frame height + an extra 2Ocm for securing the ends.
Example of a low frame: 4 metre frame 95 cm high you need 6.3 meters of GrowCover
or 4m + 95cm+ 95cm+ 40cm = 6.3m.
This allows 20 cm of GrowCover at each end that can be secured with butterfly clips, timber, bricks or an earth staple
Or use the fabric calculator as a guide.


Hint 1:
When the GrowCover is new water has a tendency to form some droplets on it. This stops when the GrowCover has been in uses for a while and the GrowCover feels softer. This is normal.
Hint 2:
One side of the GrowCover is slightly rougher than the other – put this side facing outwards.
